Ultimate Meteora Guide
First things first: congrats on the bull market.
Right now the main narrative in crypto is meme coins (a.k.a. shitcoins) on Solana. Actually, the whole narrative is Solana. Same as meme trading, farming on Meteora carries risk — limited, but still risk. That doesn’t change the fact that you can farm real money on this protocol right now and position yourself for the $MET airdrop.
I’m writing this for my crypto community PiracyData and for my people.
Note: some parts were originally written in October/November, and I finished the rest in January. So don’t whine.
Table of Contents
- Quick intro to Meteora + main takes
- How it works and where fees come from
- Pool parameters
- How to pick the most profitable pool
- Interface (for newcomers)
- Tips / Tactics
- Bots and pool parsers
- Useful tools / links
- Final thoughts
1. Meteora in short + key takes
Meteora is a liquidity protocol on Solana. It supports everything from stables and majors to meme coins with ~$1M market cap (or less). It’s a spin-out from Jupiter — the main DEX / swap aggregator on Solana.
Everyone already knows there will be an airdrop. The interesting part: current logic is basically “$1 of fees earned = 1000 points.” That’s the incentive.
Yeah, it’s more complex than using a referral link in a swap bot while posting some “100x PnL” screenshot.
Why Meteora matters (my takes)
- You’re not just positioning for an airdrop. You’re also farming real fees right now.
- People got numb after all those useless L2 airdrops on Ethereum last summer. They forgot that some airdrops are still genuinely life-changing for small wallets.
- Everyone talked about Meteora, tried to multi-account, but when they realized this takes actual thinking (not just wash volume), they gave up. That’s good. In CIS specifically there’s underfarming, meaning less competition.
- The hottest thing in crypto right now is meme coins from pump.fun. All of these coins still need liquidity. Sometimes the Meteora pool is literally ~50% of a token’s entire available liquidity (and by Jan ‘25: even more). So this protocol is basically one of the pillars holding up the shitcoin meta.
- TGE was originally hinted for Q1–Q2 2025, and the assumption back then was “market will be insane by then.” (That was the October view; now we already know TGE got delayed and most likely won’t happen in Q1/Q2.)
OK. Now let’s break down how it actually works.
2. How this works and where fees come from
For a token (especially a meme coin) to trade properly, it needs liquidity. That liquidity sits in pools.
pump.fun blew up because anyone could issue a token for basically nothing and then seed a Raydium pool, giving it instant tradability. Low cost to launch + instant liquidity = flood of new tokens + massive speculation.
As a token grows (market cap, holder count, attention), the initial Raydium liquidity may not be enough. This is where Meteora comes in: it incentivizes LPs (you) with trading fees from its DLMM pools. Meteora fees are high compared to Raydium — on purpose. High fees = strong LP incentives.
Important detail: up to late December, Meteora didn’t charge a protocol fee for itself. Later there was some FUD about protocol fees being introduced, but in practice it’s a small cut, not a rug.
Who’s trading in high-fee pools?
1. Swap aggregators
Example: Jupiter. Jupiter routes swaps through whatever path gives the user the best execution. Sometimes that means tapping a Meteora pool, even with higher fees, because the price in that pool is better at that moment. The user still gets the best net rate, and you (LP) get paid.
2. Arbitrage bots
Bots monitor price differences across pools. If Token X is cheaper in Pool A and more expensive in Pool B, the bot buys in A and sells in B instantly. That creates volume and pays fees into your pool. This is a huge source of Meteora volume.
3. Normal traders
Once a pool has decent liquidity, regular users can just buy/sell straight from Meteora’s UI. That also routes volume.
And don’t forget Phantom. Phantom hit #1 in the US App Store at one point. Almost every swap in Phantom is routed through Jupiter. So as long as a token is active, volume will keep hitting these pools.
Bottom line: the money flow is legit. Volume is real. Fees are real.
Now let’s talk pool settings.
3. Pool parameters
3.1 Basic metrics + Bin Step
| Metric | What it means |
|---|---|
| TVL | Total liquidity in the pool |
| Fee | Base swap fee in that pool. LPs earn this. |
| 24h Vol | Total swap volume over the last 24h |
| 24h Fee / TVL | Rough revenue/TVL ratio. Don’t rely on it too much. |
Now the core concept: Bin Step.
Bin Step is how liquidity is sliced into discrete price bins. People see “bin step 125 / 250 / 400” and don’t actually get it. Easiest way to think about it:
| Bin Step | ~Price increment per bin |
|---|---|
| 100 | ≈ 1.0% |
| 125 | ≈ 1.25% |
| 250 | ≈ 2.5% |
| 400 | larger jumps / wider spacing |
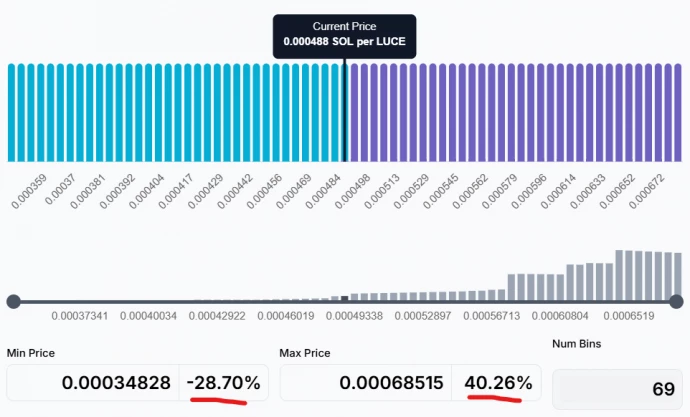
Your position can span up to 69 bins total: 1 “center” bin at your entry price, up to ~28 bins below / ~40 bins above that center (it’s asymmetric — DLMM internals, don’t expect a clean 34/34 split).
This bin structure defines:
- How wide your active price range is
- How exposed you are to Impermanent Loss
- How often you’re in-range to earn fees
Example:
Bin Step = 100.
You choose the full 69-bin range.
Your active range is roughly −28% below entry to +40% above entry. As long as price trades inside that, your liquidity is active and you’re earning fees. Outside that range, you’re basically just holding one side of the pair.
You can tighten or widen this range. Tighter range = higher concentration = more fees per move but higher risk.
3.2 Built-in “strategies”
When you add liquidity in Meteora DLMM, you’ll see presets:
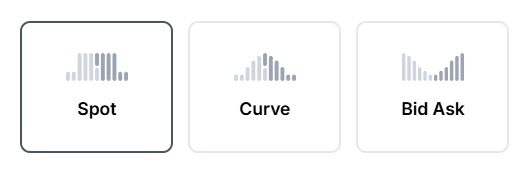
Spot
Liquidity is spread evenly across the whole chosen range. Medium risk. You’re constantly buying low / selling high in balanced chunks.
Curve
Liquidity is heavily concentrated in the center. Highest risk.
- You print insane fees if price chops tightly around entry.
- If price moves away fast, most of your liquidity stops earning.
- On downside, IL explodes because you get stuffed with the dumping token.
Bid-Ask
Liquidity sits mostly at the edges. Lowest risk.
- “Buy the dip cheaper, sell the rip higher.”
- Near your exact entry you have less liquidity → fewer fees while price stalls there.
- But you’re less exposed if it nukes right after you enter.
Important: these are just presets. You can reshape the distribution later using Add Liquidity / Withdraw Liquidity. The preset is just a starting template.
You still have to watch price. None of these are fire-and-forget.
3.3 Quick Impermanent Loss math
Example setup:
- You deposit equal value of SOL and the token.
- Bin Step = 100.
- Strategy = Spot.
- You take the full 69-bin range (≈ −28% to +40%).
Now price dumps to the bottom of your range. What happens?
- The token you bought for 1 SOL is now worth ~0.72 SOL.
- The SOL placed in lower bins mostly converted into the token as it fell, now worth ~0.86 SOL.
- Total ≈ 1.58 SOL vs original 2 SOL. IL ≈ 0.42 SOL already.
If price keeps dropping past your range, IL accelerates. It’s still slightly better than just buying the token with all 2 SOL at the top, because you sold some high / bought some lower, plus you earned fees on the way down.
IL can be large and fast. Respect it.
4. How do I choose the most profitable pool?
Important: “Profitable” from fees ≠ “Safe.” High-yield pools can still blow you up.
4.1 Choosing a token
Before you even touch Meteora, you need a token you actually want to LP.
Where to find candidates:
- https://photon-sol.tinyastro.io/en/trending
- https://www.geckoterminal.com/solana/pools
- https://dexscreener.com/
- https://www.dextools.io/app/en/solana/pairs
- https://gmgn.ai/?chain=sol&ref=Enoinell
- Meteora-focused view:
Meteora pools (5m, sorted by volume)
Set filters. You don’t want total garbage.
| Filter | Why it matters |
|---|---|
| Market cap ≥ ~$1M | Below that, most coins are not even in proper Meteora pools yet |
| Liquidity ≥ ~$150K | Ultra-illiquid pools are pure roulette |
| Sort by Volume | Shows which tokens are actually trading instead of just existing |
| Time windows (1m / 5m / 30m) | Is this a one-minute spike, or sustained flow? |
Reminder: Your fees come from volume routed through your specific pool, not the token’s global volume.
4.2 Filtering rugs / trash / -80% nukes
Things to check:
- Age / structure of the chart.
If it launched 10 minutes ago and is straight up only, that’s max risk. Sometimes you want that (fee farming), but understand the risk. - Chart sanity.
If it’s just full vertical, no pullbacks, no base, that’s dangerous. Healthy charts have at least some traded structure. - Rugcheck tools:
https://rugcheck.xyz/
https://app.bubblemaps.io/sol/
Bubblemaps shows token distribution. If a few wallets control a ridiculous % of supply, that’s scary. - Top holders / whales.
Most explorers will show you top holders. Less concentration = safer. But devs can split one stack across many wallets, so don’t get lazy. If you see a big wallet tagged as “insider” / “vesting,” it may just be team allocation locked via streamflow.finance. Check the project’s Twitter — legit teams usually mention vesting/lockups. - Top traders and early wallets.
If a few whales are still holding huge size and haven’t dumped, you might be entering right before they nuke it -80%. For very fresh tokens (10 min–2h old), check the first wave of buys. If early wallets aped size at launch and are just sitting, you are probably buying their exit liquidity near local highs.
If you still like the token: copy its contract address (CA). You’ll need it to find its Meteora pools.
Example of dangerous chart:
4.3 Real pool volume (not just Raydium volume)
If you’re already using the Meteora-specific dexscreener view above, you’re mostly fine. It’s already filtered for DLMM pools.
Otherwise, here’s the main issue:
Most dashboards show total token volume, which is often mostly Raydium. We only care about Meteora DLMM pools.
Workflow:
- Take the token CA.
- Go to Meteora.
- Paste the CA into search.
- See all DLMM pools for that token (different params, different fees).
- Open the active ones in new tabs.
Inside each pool you can view:
- Bin Step
- Base Fee
- TVL
- Volume (last 5m / 30m)
- Orderflow / recent trades (“tape”)
Why this matters:
Meteora’s UI API lags. It can update every couple minutes. In meme land, 2 minutes = lifetime. You want to see if swaps are firing every few seconds right now. That’s the money.
4.4 Choosing the pool + baseline math
Goal: You earn fees. Fees come from volume. Fees are split among LPs active in the bins that are actually getting traded.
Fast napkin math
Assume:
- Pool TVL = $100K
- Base fee = 2%
- 5-minute volume = $50K
- You’re adding $1K liquidity
$50K volume × 2% fee = $1,000 fees generated in 5 minutes (gross).
Your $1K is 1% of TVL → you “deserve” ~$10 of that $1,000.
That’s not exact. But it’s a fast gut check: “Is this even worth opening?”
Now the real part:
- Not all liquidity is active.
TVL includes all liquidity in the pool — including liquidity that’s way out-of-range and not currently earning. Dead liquidity ≠ competition. The real competition is liquidity inside the currently traded bins. - Fees are earned per bin, not globally.
Swaps route through bins. If your liquidity is ~10% of the bin(s) that get hit, you get ~10% of those fees — not 1% of the entire pool.
This is why looking at bin distribution matters.
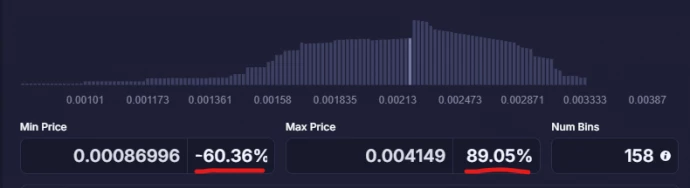
In the position preview:
- Gray curve = total liquidity per bin (the market).
- Blue bars = how much SOL you’re adding in those bins.
- Purple bars = how much token you’re adding in those bins.
Hover a bin → Meteora shows what % of that bin will be yours. That’s how you estimate your cut.
Example scenario
- Bin Step = 100
- Fee = 2%
- Someone market-sells $10K worth of the token in one hit, pushing price down ~5% across ~5 bins.
- 2% of $10K = $200 total fees generated.
- If your liquidity is ~10% of those bins on average, you pocket roughly ~$20 from that one sell.
That’s real money in a tiny window.
Takeaways:
- It’s not only “high volume token.”
- It’s “am I a meaningful % of the active bins being hit right now?”
- Watching the tape matters.
Pool archetypes (how I think about them)
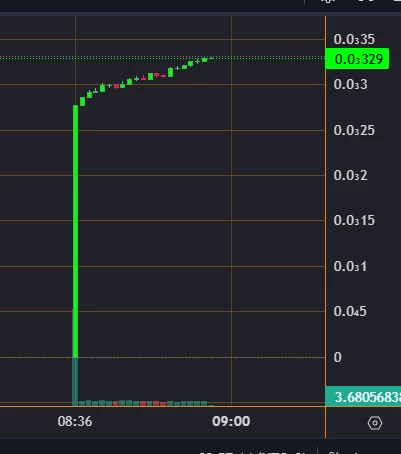
A) Fresh token pools
Profile:
- Token is 10 minutes old / just started ripping
- Big volume
- Low TVL
- High risk
Good pool params:
- Bin Step 100 + Fee 5%
- Bin Step 125 + Fee 5%
- Bin Step 200 + Fee 5%
Target tokens with ≥ $1M market cap.
You can even farm with 0.5 SOL.
If TVL is almost zero and the pool has spicy params:
- Join an existing pool that already has some TVL (you’re not alone vs the nuke), or
- Create your own pool (see Section 5.2).
These are max risk / max print. Sometimes you cover IL in minutes and walk away in profit. Sometimes you get nuked -90%. You cannot overstay here.
Same logic applies to tokens that just broke ATH with violent volume: when a token rips to new highs, there’s usually no liquidity up there yet. If you’re first to seed that range with high-fee bins, you vacuum fees.
B) “Semi-established” token pools
Profile:
- Token exists for a few hours (maybe days)
- Already had multiple pullbacks
- Market cap ~ $3M+
- Volume decent, TVL moderate
- Medium risk
Good params:
- Bin Step 100 + Fee 1%–2%
- Bin Step 125 + Fee 1%–2%
- Bin Step 200 + Fee 1%–2%
- Bin Step 250 + Fee 1%–2%
Here you can start with 1–2 SOL comfortably. Higher Bin Step = wider range = safer to sit longer and survive random spikes/dips. This is “sit, farm, monitor.”
C) “Mature” token pools
Profile:
- Token is 3–4 days+ old
- Market cap ≥ $10M
- Chart is liquid and stable
- Lower/medium volume, high TVL
- Lower risk
Reality check: when caps pass $100M+, TVL is massive. If you’re not dropping 10+ SOL, you’re tiny and probably won’t print much. Upside: you can sit in these pools longer (multi-day, sometimes a week) without constant panic.
Short-term farming?
- Bin Step 20 + Fee 0.2% / 0.25%
- Bin Step 25 + Fee 0.25%
- Bin Step 40 / 50 + Fee 0.4% / 0.8%
- Bin Step 80 + Fee 0.8% / 1%
Small bin steps = tight range = token can chop there for hours. Great for fee farming if volatility is local.
Want to sit longer?
- Bin Step 80 + Fee 0.8% / 1%
- Bin Step 100 / 125 + Fee 0.8% / 1%
- Bin Step 200 + Fee 2%
- Bin Step 250 / 400 + Fee 2% / 5% (“park here for days+” mode)

Main risk on long sits isn’t local chop, it’s macro. Bad news nukes the whole market.
Tokens like $WIF / $BONK etc.: usually pointless to LP unless you’re big. TVL is huge, volume/TVL is weak.
TL;DR: start with medium-risk pools. Lower instant death chance, decent fee chance.
5. Interface (for newcomers)
5.1 Entering and exiting a pool
Go to https://app.meteora.ag/ and connect wallet.
Make sure you’re on DLMM. The rest isn’t relevant here.
Paste the token CA into search. You’ll see pools. Click “Show All” if needed. Only care about SOL pairs. Ignore pools vs random other tokens.
Click a pool. You’ll see:
- Pool parameters (Bin Step, Fee, TVL, etc.)
- Tools / links Points, profit view, external charts (volume + order book)
- Your position
- Shows your active positions (yes, you can have several)
- If you have none, you’ll see “Add Position”
- “Swap” lets you quickly swap SOL/token inside this exact pool (useful to buy token for LP or unwind after exit)
- Slippage settings
- Liquidity Slippage = tolerance for adding/removing liquidity
- Swap Slippage = tolerance for swaps
I usually set Liquidity Slippage ~10% so I can enter smoothly.
For volatile low-cap tokens, set Swap Slippage higher (up to ~10%).
For big caps, ~2–3% is enough. - “Match deposit values” toggle
Usually turn it off. You don’t always want perfectly balanced USD value of token and SOL.
Then you choose:
- how much SOL and how much token you’re depositing
- which strategy preset (Spot / Bid-Ask / Curve)
- your bin range (you can drag sliders tighter or wider)
You’ll see a visual:
- Purple bars = bins where you’re mostly providing the token
- Blue bars = bins where you’re mostly providing SOL
- Gray curve = total pool liquidity per bin Hover to see what % of a bin you’ll control.
When you’re happy → confirm the position.
Exiting
Open the position and hit Withdraw.
- Claim Fees Claim fees without closing the position. You can even re-add those fees back into liquidity to compound.
- Withdraw Liquidity Pull your liquidity (partial or full) without closing the position or claiming fees.
- “Show bins” = selectively withdraw from parts of the range. Useful to rebalance into more active bins.
- Withdraw and Close Position Full exit + claim fees + position closed.
After exit: swap leftover token back to SOL. Don’t hold random dead bags you forgot about.
5.2 Creating your own pool
Why create a pool?
- It might become an extra criterion for the airdrop.
- New tokens sometimes don’t have a good Meteora pool yet, or the existing one has trash parameters (fee too low, bin step wrong).
- If you’re early and you spin up a pool with high-fee / good bin settings, you can print absurd fees — if the token survives.
- Dark side: if the token dies instantly, you volunteered as exit liquidity.
How to do it:
On the DLMM page click +Create Pool.
- Paste the token CA
- Pick Base Fee and Bin Step
- Set initial price (copy from their reference)
- Click Create
Creating a pool costs slightly more gas/tx cost than just opening a position. After creation you land on the new pool page and you can add liquidity normally.
For brand-new high-volatility tokens, IMO best starting params are something like Bin Step 100 / 125 with Fee 5%. That’s max-print mode. Only do this if you accept full rug risk.
6. Tips / Tactics
6.1 Practical tips
- Faster TX execution
In your wallet, set a custom RPC (for example from helius.dev). Faster RPC = faster entry. - Don’t overstay in fresh “printing” pools.
Get in, print, get out. Most new high-volume tokens dump fast.
But: watch them after first nuke. Sometimes they stabilize around a $1M+ cap and start legit ranging. Under ~$500K cap I wouldn’t bother. - Claim fees and re-add them.
This compounds your size if you’re planning to sit for a while. - Be careful with Curve.
Curve prints insane fees in tight chop, but IL explodes if price moves hard. Respect it. - Combine strategies.
Open half your size with Bid-Ask, then Add Liquidity with Spot for the other half.
Result:- Better fee capture near entry (Spot)
- Downside cushion (Bid-Ask)
- You’ve basically built your own custom curve
- Rebalancing matters.
If price keeps trading in one subrange, withdraw from “dead bins” and add to “active bins.” Higher yield but higher risk. You can also stack multiple positions to cover more than 69 bins total. - Dip-catch strategy (for tokens that aren’t total garbage)
If a token you trust dips -15% / -20% / -30%, enter the pool with SOL only around mid-dip.
Goal:- Wait for bounce
- Farm fees during rebound in-range
- Exit near recovery
- Draw lines.
Mark your range boundaries and entry on the chart. Track “am I still in range?” visually. - Start small.
Experience matters more than theory here. Use tiny size until you’ve felt pain. - ATH breakout strategy
High-skill / high-risk. Works best on newer tokens where DLMM liquidity is still thin:
- Token breaks ATH
- Volume spikes hard
- No liquidity in the new range yet
- You rush in and seed that range with high-fee bins
6.2 Bid-Ask or Spot?
People argue about this nonstop. Curve is obviously high risk so fewer people touch it, but Bid-Ask vs Spot is a daily debate.
Bid-Ask: strengths
- Lower downside risk.
- Most of your SOL only converts to token on dips.
- Most of your token only sells to SOL on rips.
- So you lose less if it nukes, and capture more if it moonshots.
Bid-Ask: weakness
- Near your entry price, you deploy less liquidity → fewer fees while price ranges there.
- Classic scenario: bot pings you on a currently printing token. Volume is happening right now. With Bid-Ask, you’re underexposed right now.
Spot: strengths
- You’re deployed across the active range immediately.
- You farm the current flow aggressively.
Spot: weakness
- Higher IL if the token nukes right after you enter.
My approach
I usually farm with Spot because I want instant fee flow, but I don’t ignore Bid-Ask.
You can hybrid it:
- Open half your size as Spot
- Immediately Add Liquidity as Bid-Ask with the other half
What happens:
- You boost fee capture near current price (Spot)
- You still have downside cushion (Bid-Ask)
- You basically build your own distribution curve
Fun fact: Bid-Ask + Curve together basically looks like Spot.
Bottom line:
Spot = nice fees now.
Bid-Ask = risk control.
You can merge both and get the best of each.
6.3 HONK Index / DLMM market health
GooseDAO introduced the HONK Index: a dashboard for DLMM pool health across meme/shitcoin land.
Why it matters:
DLMM pools on Meteora now hold a massive share of liquidity in these tokens. So tracking DLMM health = tracking the meme market.
Which pools are tracked?
They filter for “viable” pools that meet:
- Lincoln Score ≥ 1%
- Market Cap ≥ $2M
- Age ≥ 4 hours
Market cap + age are obvious. Lincoln Score:
- Metric based on swap activity in the pool over 1h / 6h / 24h, plus how “printable” (profitable for LPs) the pool is.
- <1% → skip.
- ≥1% → viable. Higher is better (more fees per liquidity).
What HONK Index shows:
- Pools — Number of viable pools in last 15 minutes. Green = a lot of decent farms with relatively lower risk.
- Imb — Swap imbalance across pools for the same token. If only 2 out of 10 pools get all the flow, that’s not healthy. If 5 out of 10 are active, way better. Imb basically tells you how concentrated the flow is.
- 1d Vol — Total daily volume in viable pools. Green = more than yesterday.
- 1d TVL — Liquidity change over 24h. Green inflow = confidence.
- 1d Fees — Fees earned by LPs in the last 24h.
- 1d Yield — Fees / TVL. Basically: how hard the market is printing for LPs per $ of liquidity.
The index is open source and can be run on a Discord server. Treat it like a market weather report for DLMM. It tells you if the farming meta is hot or dead, without having to manually scan 200 tokens.
7. Bots and pool parsers
People always ask about “alpha bots” and Telegram channels that ping “printing pools.”
Bots
- Yes, they make sense.
- But if you’re only deploying like 1–2 SOL per account, most of the time you won’t print enough to justify bot overhead.
- If you’re farming one wallet manually, you can just work by hand.
- If you want to scale many wallets at once, bots start making sense.
- I personally don’t use them — I prefer to scale one account to where I want it, then move on.
Parsers
- Telegram parsers that alert “high fee pools” are useful for beginners.
- BUT: they’re not perfect. Most just sort by high TVL or surface-level stats.
- They don’t always reflect bin-level competitiveness, which is where the real alpha is (see Section 4.4).
- They’re a good starting point, but you still have to look at the token chart and whale distribution yourself.
Some Telegram pool scanners / alerts worth looking at:
- @Meteora_DLMM_Bot
- @meteora_pools_selector_bot
8. Useful tools / links
Wallet stats / PnL for Meteora
https://geeklad.github.io/meteora-profit-analysis/
Early features / staging
PnL / fee breakdown after closing a position
https://www.metlex.io/
Paste the close tx and see profit/loss, fees earned, etc. Meteora sometimes links you here automatically after exit.
Live PnL / IL while position is still active
https://lp4fun.vercel.app/
Paste your wallet and track.
Official docs
https://docs.meteora.ag/
Read it. Everything is documented.
Analytics dashboard
https://dune.com/sigrlami/meteora-overview
Hourly pool stats (good for hunting active pools)
Looker Studio dashboard:
Latest pool activity view
Community / support / alpha
Impermanent Loss math deep dive (with code)
https://teletype.in/@xtdimasxt/9NMyNZ1pgIb
English DLMM guide
https://thewise.trade/dlmm-guide/
9. Final thoughts
Meteora DLMM is not “click button, get airdrop.”
It’s active liquidity management in hyper-volatile microcaps, with asymmetric upside if you’re early and paying attention.
Core points:
- Fees come from real flow: arbitrage, aggregators, degen rotation.
- You’re competing for % share in the active bins, not just % of total TVL.
- IL is real. It will hit you if you’re careless.
- You don’t have to YOLO Curve. You can hybrid Spot and Bid-Ask and build your own profile.
- Start small. Track live volume, watch whale distribution, don’t fall in love with any token.
If you treat it like work instead of like a screenshot game, Meteora can pay you now — and maybe again later with $MET.